Sunday, December 30, 2007

MP3 Encoding

Having an MP3 of a song is pretty useful for posting on websites, sending to friends, asking for advice on Cakewalk forums, etc. However, the trial version of the MP3 encoder in SHS doesn’t last very long. After searching a bit in the forums, the LAME encoder came up quite a bit, so I decided to try it.

Finding LAME, downloading it (http://sourceforge.net/projects/lame/), and getting it set up on my computer weren’t that hard. The problem was getting SHS6 to recognize it. The help file talked about the “Tools -> Cakewalk Ext Encoder Config” option on the menu, but for some weird reason, it didn’t appear on the menu bar for me. However, while searching for something else, I just happened to find a file titled “EncoderConfig.exe” in the Cakewalk\Shared Utilities folder. And sure enough, opening it brought up the window I needed for the LAME encoder.

Following the help file instructions for most of the process is straight forward, except for the command line. You can find all the settings on the LAME site, but here’s what I used for 160k mp3s:
lame %I -b 160 -m j -h -c -V 2 --tt "%T" --ta "%A" %O
For the rest of it, just click New, type a name and description, and browse to the path where you have the LAME encoder. When you’re finished, click Save. When you then reopen SHS6 and export the song, this should now be available.

Interestingly enough, once I’d done this, the menu option “magically” appeared.

Anyway, hopefully this walkthrough and command line example will be helpful to others facing this challenge.

Friday, December 28, 2007

Soft Synths: Session Drummer 2

I know that this will only be relevant to users of SHS6XL and Sonar Producer, but I wanted to share what limited knowledge I have about the Session Drummer 2 (SD2) soft synth.

To start, insert the SD2, clicking MIDI Source and First Synth Audio Output in the option dialog box. When the SD2 window opens, click on the triangle next to PROG, then Load Program... to load a suitable program, which includes the MIDI patterns and kit. Once that's done, click on each pattern (A, B, etc.) and the play button to hear what it sounds like.

Once you've found a kit and pattern that you like, you'll need to insert it into the song. To do so, find the eighth note symbol next to the name of the MIDI pattern (see below), and drag that to the point in the MIDI track where you'd like it inserted. This inserts the actual MIDI pattern in the track, where you can then further change and manipulate it as you like.
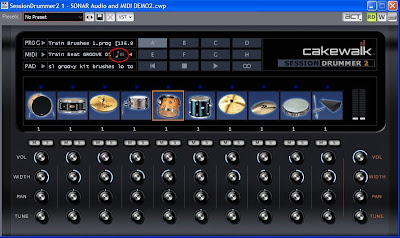


One cool thing about SD2 is the sensitivity to velocity. If you click on each drum's picture, you'll notice the change in velocity, from soft at the bottom to hard at the top. This is useful if you choose to record drum parts using a touch-sensitive keyboard. Right-clicking on the picture will show you which note is assigned to each drum; unfortunately for keyboard users, that doesn't correspond to a pitch on the keyboard - it's just a number. Still, it's not hard to figure it out with a little trial and error.

Another option: When inserting the SD2, instead of First Synth Audio Output, choose All Synth Audio Outputs: Mono. I usually choose to insert a Synth Track Folder as well, so that they're all organized in one place. What this does is open up 16 synth tracks that all refer to the SD2. There's a number under each drum's picture; click on the number, then use the up or down arrow keys to change the number. This changes the output of that particular drum to one of the tracks just created. (One weird thing: the number can only go to 8, despite there being 10 drums shown in the SD2 window. And when you click All Synth Audio Outputs: Mono when inserting the synth, it creates 16 tracks, despite only 8 being available.) Once you've routed a drum to a particular track, you can then add effects, such as huge reverb on the snare drum for an '80s sound, to each individual drum's track as you like.

So those are the basics. I still have some to learn about the SD2, but I've been able to get started with the above foundation. If you have any questions, leave a comment or shoot me an e-mail, and maybe we can figure it out together.

PS. One of my biggest complaints about SD2 and other parts of SHS has been the lack of quality documentation. Well, I just found out today that there is at least some minimal documentation included with SD2 in the form of a help file. To read it, find the VST plugins folder, and look for the "\Session Drummer 2\Documentation\sessiondrummer2.chm" file. Alternatively, click inside the SD2 window and press F1. It's not the biggest help file I've ever seen, but at least it covers the basics.

Wednesday, December 26, 2007

Soft Synths: TTS-1

Soft synths are an integral part of music creation for many modern artists. Cakewalk's Sonar Home Studio includes several soft synths, including TTS-1. This synth is the General MIDI workhorse, and includes all the sounds needed to pl

ay those MIDI files you might download from websites. As I think I've mentioned before, I don't use Microsoft's General MIDI Mapper, so I'll assign the MIDI file's outputs to the TTS-1 instead.

To use the TTS-1, click Insert -> Soft Synths and choose the Cakewalk TTS-1.

(By the way, SHS6 has a nifty little feature called the Synth Rack. Either click Views -> Synth Rack, or press Alt-8. Then, you can click the plus symbol in the upper left of the synth rack to add a synth. I've set my default template to display the synth rack upon opening.)

Next, you'll see a Insert Soft Synth Options dialog box, which should look something like this:


These are my default settings, and they work fine for the TTS-1.

Once you insert the synth, you'll see two tracks: the synth track and the MIDI track. Both of these are necessary for sound. Make sure that the synth track's Input is set to Cakewalk TTS-1 1 Output 1: Stereo, and the Output is set to the audio output (such as a summary bus or the sound card). And make sure that the MIDI track's Output is set to 1-Cakewalk TTS-1 1.

When you insert the synth with the above settings, TTS-1 will open. Each channel is displayed from left to right, and the patch for each is shown at the bottom. Clicking on the patch name allows you to choose a different pitch. You'll notice that channel 10 shows Standard Set; channel 10 is always used as the percussion channel for General MIDI.

One good thing about the TTS-1 that's not true for all soft synths is that you can use the same synth for several MIDI tracks. This means that you can assign one track to the first channel and assign a patch, assign a second track to the second channel and assign a different patch, and so on.

One more thing: While playing around today, I wanted to play a single part on my MIDI keyboard and hear the part on the TTS-1 and Dimension LE simultaneously. It's easy to do; just have a MIDI track for each synth, and set the inputs for both those MIDI tracks to the source (my keyboard, in this case). Then, make sure that you've clicked the Input Echo button - the one one with three curves to the right of the Mute, Solo, and Record buttons on the track - to turn it on for both tracks.